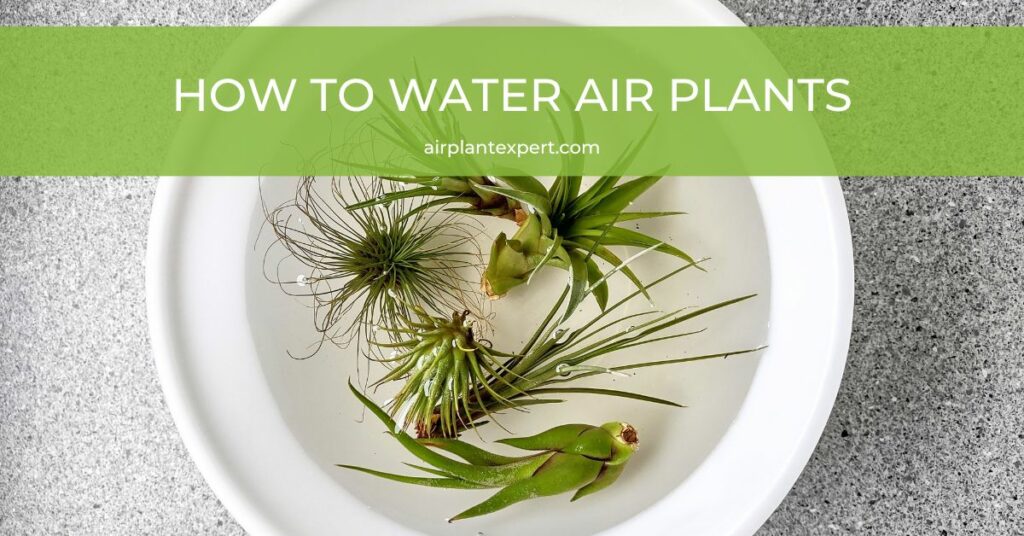
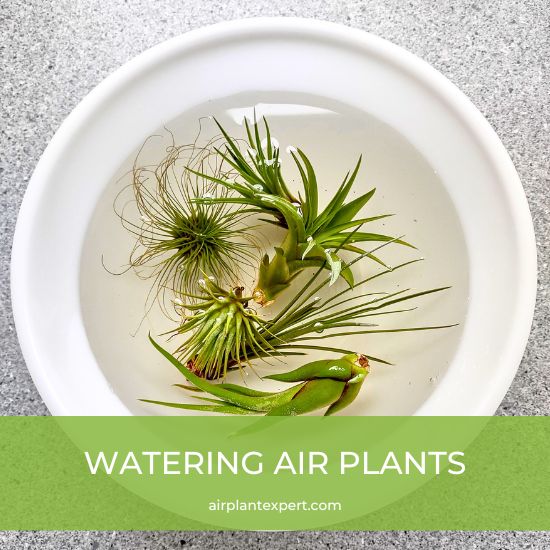
The best way to water air plants if you’re new to the hobby is to soak them once a week for 20-30 minutes. It is important to note, however, that some species of Tillandsia prefer regular misting instead, typically 2-3 times a week.
Indoor environments tend to be very dry and lack humidity so start with the soaking method and adjust your watering approach accordingly as you become more familiar with your lovely air plants.
In this article, I provide many tips on how to water your air plants successfully using the soaking and misting methods, and you’ll learn the do’s and don’ts of watering your Tillandsia.
- Watering Tillandsia
- How Often Should I Water My Air Plants?
- What Type of Water Should I Use for Air Plants?
- How to Know When to Water Air Plants
- How to Mist and Soak Air Plants With Flowers
- How to Water Air Plants Attached to Wood and Other Objects
- Can You Overwater Air Plants?
- How Do Air Plants Absorb Water?
- Humidity and Air Plants
- 7 Expert Tips for Watering Tillandsia
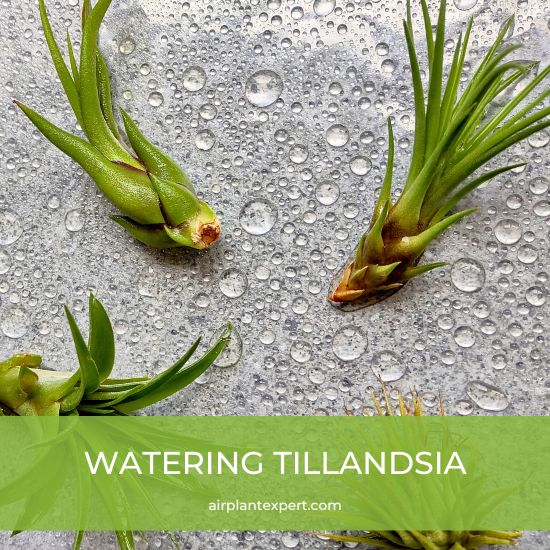
Watering Tillandsia
Soaking Air Plants
It’s true that some species of air plants only require misting however most Tillandsia, particularly those kept in an indoor environment, will prefer a weekly soak.
Here’s how to soak air plants:
1. Choose Your Soaking Container – Begin by selecting a container that is large enough to submerge your air plants. You could use a bowl, bucket, sink, bath, or any other type of container.
2. Fill The Container – Fill your chosen container with enough water so you can completely submerge your air plants. I recommend rainwater, however, you can use soft tap water that has been left standing for 2-3 days, to allow the chlorine in the tap water to evaporate. This also allows the water to reach room temperature. You can also use spring, pond, or aquarium water, which are all preferable to using tap water.
3. Soak Your Air Plants – Once the container is ready, place your air plants in the water and allow them to soak for 20-30 minutes. If you’re soaking dehydrated plants or you live in an arid (hot and dry) climate, you can leave your plants to soak for longer. It’s essential to make sure your plants are entirely underwater so that all areas of the plants can be adequately hydrated.
4. Remove Excess Water – After soaking, remove your air plants from the water, turn them upside down, and give them a gentle shake to help remove any excess water. Try to hold your plants by their base or underside when handling them so you do not rub the plant’s leaves, as this can damage delicate plant tissues.
5. Drying Your Air Plants – It is essential to dry your air plants properly after soaking them. I have provided some tips and advice regarding the drying process below.
Soaking your air plants is an essential part of their care routine. By following these simple instructions you’ll ensure that your plants stay healthy and happy for a long time.
We have a more detailed article on how to soak air plants if you’re interested in learning more.
Misting Air Plants
Some species of Tillandsia will thrive with just misting. However, as I said above you may find that a weekly soak is the best option for air plants kept in an indoor environment. Having said that, if you know which Tillandsia species you own and it belongs to the xeric group of air plants misting 2-3 times per week may be more appropriate.
Here’s how to mist air plants:
1. Prepare The Water – I recommend rainwater, however, you can use the pond, spring, or aquarium water instead. If these water sources are not available you can use soft tap water that has been left standing for 2-3 days. This allows the chlorine in the tap water to evaporate. Fill a spray bottle or mister with lukewarm or room temperature water and you’re ready to start misting.
2. Thoroughly Wet Your Plants – When you’re misting, hold the spray bottle about 6-12 inches away from your plants. This helps to ensure that the water droplets are spread evenly. Spray the water onto the leaves making sure to cover the entire surface area of your plants.
3. Remove Excess Water – After misting, turn your plants upside down and give them a gentle shake. This helps to remove any excess water. Be careful when handling your plants so you don’t damage their delicate leaves. Try holding your plants by the base or their underside so you do not rub the plant’s trichome-covered leaves.
4. Drying Your Air Plants – It is essential to dry your air plants properly after misting them. I have provided some tips and advice regarding the drying process directly below.
As I’ve said before, some species of Tillandsia prefer misting instead of soaking so getting to know your air plants i.e. which species you own, will help when watering. With regular misting, your Tillys will thrive and grow.
We have a more detailed article on how to mist air plants if you’re interested in learning more.
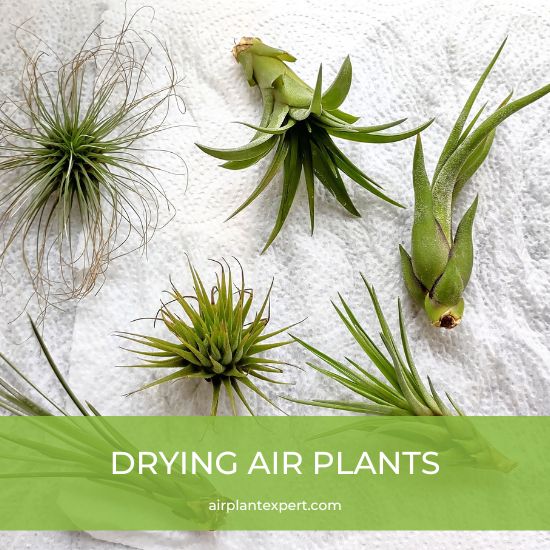
Drying Air Plants After Watering
After watering your air plants it’s essential to ensure they are dried properly to prevent rotting. Leaving water trapped between the leaves can cause damage or diseases to develop, so it’s crucial to take care when drying your Tillandsia.
Here’s how to dry air plants properly:
1. After soaking or misting your air plants turn them upside down and give them a gentle shake to remove any excess water.
2. Then, place your plants upside down or on their sides, on a towel or paper towel, in a well-ventilated area. Your plants must be on a surface that can absorb water and not pool as this can lead to rotting. Ensure the plants are not in direct sunlight or exposed to cold drafts during the drying period as this could cause stress and damage your plants.
3. Depending on the humidity level of the room, it can take anywhere from 2-4 hours for your air plants to fully dry. You can of course leave your plants to dry overnight to ensure they are completely dry before returning them to their original location.
To help speed up the drying process you can use a fan to create air circulation. It’s essential to use the fan on a low setting so the plants don’t dry too quickly or suffer from cold drafts. It’s also a good idea to place the fan at a moderate distance from the plants to avoid any direct harm.
Some species, Tillandsia Bulbosa, for example, are particularly susceptible to rotting as water often pools or gets trapped between the plant’s leaves and bulbous base. This also happens more easily with larger air plants.
My advice is to take a little extra care when drying bulbous-based plants and make sure there is sufficient air movement/circulation.
Drying your Tillandisa thoroughly is an important part of maintaining their health. By following these simple steps, you can ensure that your plants stay happy and healthy for years to come.
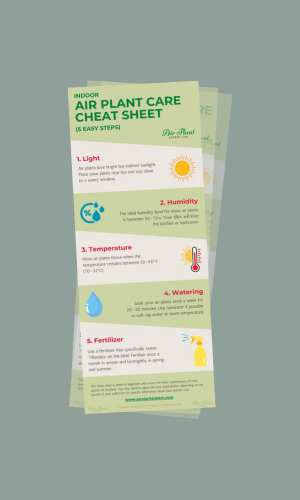
Get Your FREE Air Plant Care Cheat Sheet
5 easy steps to keep your air plants happy and healthy.
How Often Should I Water My Air Plants?
The frequency of watering air plants depends on the environment in which they grow and the type of air plant. Humidity and temperature are very important and will ultimately dictate how often you’ll need to water your Tillandsia.
In general, air plants are divided into two categories: Mesic and Xeric.
Mesic air plants generally require watering once a week, while xeric plants may only require watering every two weeks. That’s easy to remember, but what should you do if you don’t know what type of Tillandsia you own?
Well, this is why I usually recommend most people soak their air plants once a week. At least until they have identified whether they own a mesic or xeric air plant, or better still what species they own.
Identifying air plants can be challenging as they come in a wide range of shapes, sizes, and colors, and let’s be honest many species look very similar to the untrained eye. So, I will try to keep this as simple as possible …
Mesic air plants are usually much greener and more vibrant in appearance and tend to have thinner leaf tips. Also, mesic types often have softer juicier leaves, a bit like succulents.
Xeric air plants tend to have thicker leathery leaves that are often curled or twisted. They also often have a silver or greyish tint to their leaves indicating their ability to reflect stronger light and reduce water loss.
The following information briefly explains why mesic and xeric Tillandsia have different watering requirements …
Mesic Tillandsia
Mesic Tillandsia is native to more humid environments such as forests and tropical areas. They require more frequent watering and prefer consistently moist environments. Mesic air plants tend to have fewer trichomes (hair-like structures that absorb water) on their leaves because moisture is more readily available in their surrounding habitat, hence more often than not they are greener in color.
Some examples of mesic types are:
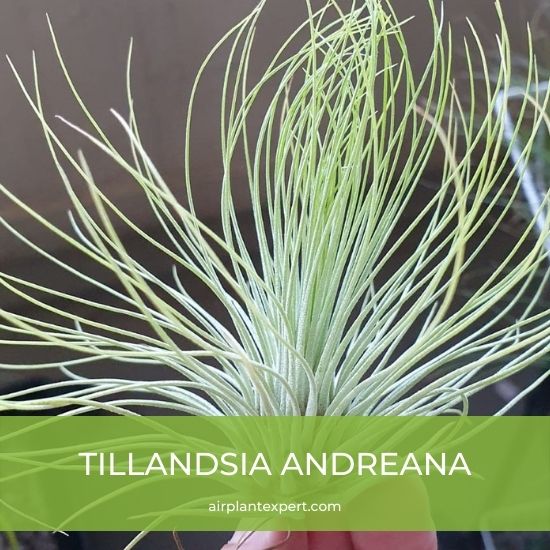
- T. Andreana
- T. Bulbosa
- T. Butzii
- T. Brachycaulos.
Xeric Tillandsia
Xeric Tillandsia is native to dry arid areas such as deserts and mountainous regions. They have adapted to survive with very little water and prefer less frequent watering. Xeric air plants usually have an abundant number of trichomes to increase their chances of absorbing more moisture from the air. Hence their leaves are sometimes silver or gray.
Some examples of xeric types are:
- T. Xerographica
- T. Tectorum
- T. Circinata
- T. Harrisii.

What Type of Water Should I Use for Air Plants?
The best type of water for air plants is undoubtedly rainwater, followed by pond, aquarium, and then soft tap water. If you’re a Tilly enthusiast like me you may want to purchase a pH testing kit from your local aquarium shop or online to help choose the best water for your plants. Tillandsia prefers slightly acidic water with a pH range between pH 5.5 and 6.0.
Rainwater
When it comes to watering air plants Mother Nature provides the ideal solution. Rainwater offers a unique set of properties that make it a beneficial option for nourishing your air plants.
One major advantage of using rainwater is its naturally low pH level. Tap water, the most commonly used water source for indoor plants often has a high pH of 8.0 or more, which is a bit too high for air plants.
In addition to being chemical-free, at least most of the time, rainwater often contains higher levels of beneficial minerals and nutrients that can contribute to the overall health of your air plants. These minerals and nutrients are important for promoting leaf growth, color, and overall plant vitality.
When collecting rainwater for your air plants, it’s important to ensure that it is clean and free from pollutants. Avoid collecting rainwater near heavily trafficked areas or areas with chemical runoff. I use a rain barrel/water butt to collect rainwater to ensure the water is clean and safe.
Pond and Aquarium Water
If you’re a fan of keeping aquatic life, then you’re in luck! Pond and aquarium water can serve as an excellent alternative to tap or rainwater when it comes to watering your air plants. Not only is it a chemical-free option, but it also contains nutrients that your plants will love.
One of the benefits of using pond or aquarium water is the added nutrients that come from fish waste and natural pond ecosystems. These nutrients can promote healthier growth in your air plants.
When using pond or aquarium water make sure it is free of chlorine and other harmful chemicals. Chlorine, commonly found in tap water, can be harmful to air plants as they don’t have roots to remove it from their systems. Most pond and aquarium water is already chlorine-free making it ideal for watering your Tillandsia.
Can I Use Tap Water on My Air Plants?
Yes, you can use tap water on your air plants. However, the tap water found in towns and cities often has a high pH of 8.0 or more, which is not ideal. Tillandsia prefers slightly acidic water with a pH of 5.5 to 6.0 which is why I prefer to use rainwater when possible.
Tap water is a convenient and accessible option for watering your air plants. However, it may come with potential risks that could harm your plants. The tap water commonly found in towns and cities contains higher levels of alkaline and salts that can damage the delicate trichomes found on the surface of your air plants.
Trichomes are tiny hair-like structures that absorb water and nutrients from the air. Should the trichomes become blocked your Tillandsia will find it increasingly difficult to efficiently absorb the moisture and nutrients they need for healthy growth.
Additionally, tap water may contain harmful chemicals like chlorine and fluoride that can damage your air plant’s foliage and cause dehydration.
Okay, so I’ve given tap water a major bashing! However, not all tap water is the same. Soft tap water contains lower levels of calcium and/or magnesium than hard tap water and is, therefore, more suitable and okay to use on your air plants.
If you use tap water remember to leave it standing overnight or better still for a few days to allow the chlorine to evaporate before watering your plants.
How to Know When to Water Air Plants
Knowing when to water air plants is a bit tricky which is why it’s easier to stick to a regular watering routine. However, knowing the signs of underwatering and overwatering will undoubtedly help you to look after your beautiful Tillandsia.
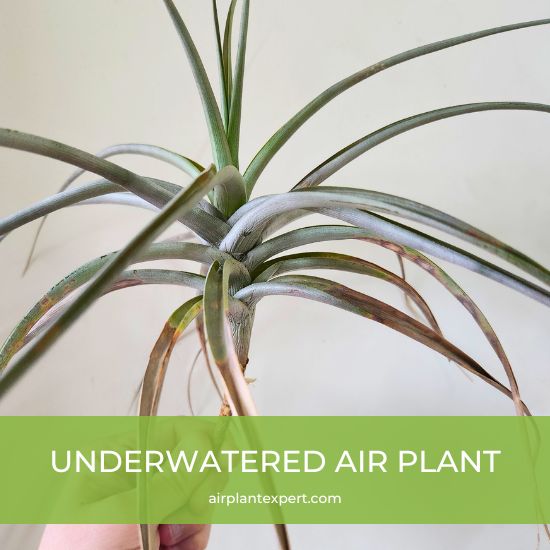
Signs of Underwatering
Here are a few signs of underwatered air plants:
- Exaggerated concave curves on the leaves – some xeric types of Tillandisa leaves begin to curl inwards when they are dehydrated creating a noticeable concave curve.
- Wilted appearance – The leaves can appear limp and dull when dehydrated giving the plant a drooping appearance.
- Dry brown leaf tips – If you notice several of the plant’s leaf tips are turning brown and dry it’s likely your plant needs extra watering.
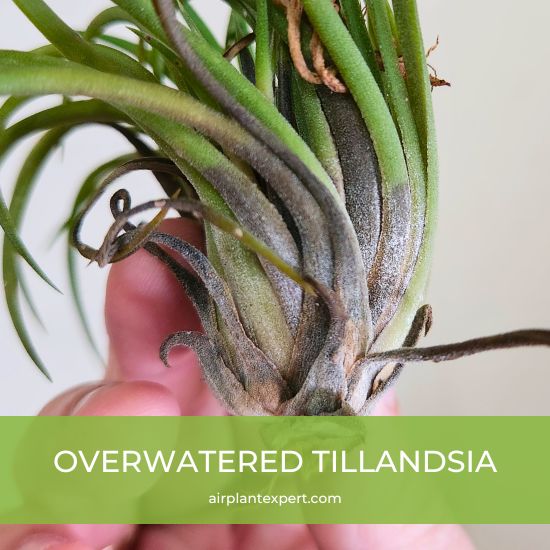
Signs of Overwatering
While underwatering can be detrimental to air plants, overwatering can also pose a risk to their health. If you notice any of the following signs it may be an indication that your plants are being overwatered.
- Rapidly falling leaves – If your air plant has recently been watered and you notice the leaves are falling off at a faster rate than usual you’re probably overwatering. This happens because the leaves are unable to absorb the excess water.
- Brown and mushy base – If the base of your air plant appears brown, black, or mushy, this indicates that the plant is experiencing base or root rot caused by excess moisture.
Underwatering and overwatering are both common issues that can harm your air plants if left untreated. By knowing what signs to look out for and taking immediate action you can help your Tillandsia recover and thrive.
How to Mist and Soak Air Plants With Flowers
When your Tillandsia is in bloom it needs a little extra care and attention when it comes to watering time. If the flowers get too wet they can easily rot which shortens the blooming period.
The best method for watering Tillandsia when in bloom is to submerge the plant’s leaves in water without wetting the flowers. To do this, fill a bowl or basin with just enough water to cover the plant’s leaves, making sure the flowers are kept completely dry and above the water.
If soaking isn’t feasible, misting the leaves more frequently can be a good alternative. Fill a spray bottle and gently mist the leaves of the plant. Be sure to avoid getting any mist on the flowers and allow the plant to dry afterward in a well-ventilated area.
Another option for watering Tillandsia with flowers is to hold the plant under gently-flowing water. This method is not ideal but can help to clean and hydrate the leaves without soaking the flowers.
By following these watering tips your flowers should remain healthy and keep their beautiful blooms for longer.
How to Water Air Plants Attached to Wood and Other Objects
If you own air plants that are mounted on wooden branches or other objects you may be wondering how to water them without damaging the mounting material. The short answer is to dunk or mist rather than soak your air plants.
The dunking method is a simple and effective way to water your mounted air plants. Fill a bowl or sink with enough water to fully submerge your plants. Then, gently dunk your plants upside down three to five times ensuring that all parts of your plants are fully submerged.
Finally, remove your plants from the water and shake off the excess water from the leaves before allowing them to air dry. This method works well for air plants with larger leaves as it ensures they are fully hydrated without getting the mounting material too wet.
For large air plant displays you may have to opt for light misting regularly. To do this, fill a spray bottle with room-temperature water and spray your plants from at least six inches away. Ensure that the mist reaches all the parts of your plants whilst being careful not to saturate the wooden object, rocks, or wireframe.
This method is ideal for air plants that are difficult to remove from their mounts or those with delicate leaves. You can of course use a garden hose to mist your Tillandsia if you can take your display outside. Just make sure you set the nozzle to mist before you start spraying.
Regardless of which method you use, it’s crucial to make sure that the mounting material does not get too wet. This can cause the wood or other objects to rot or stain, potentially harming your air plants.
We have an awesome article specifically about how to water air plants attached to wood if you would like more information.
Can You Overwater Air Plants?
You can overwater your air plants. In fact, after underwatering, overwatering is the most common mistake that Tillandsia owners make. It’s easy to prevent overwatering by sticking to a weekly watering schedule and adjusting accordingly if you notice anything unusual.
I have included some useful information about how to spot the signs of overwatering above. You have to act quickly if you notice any of these signs otherwise your plants may begin to rot like this badly rotten Tillandsia …
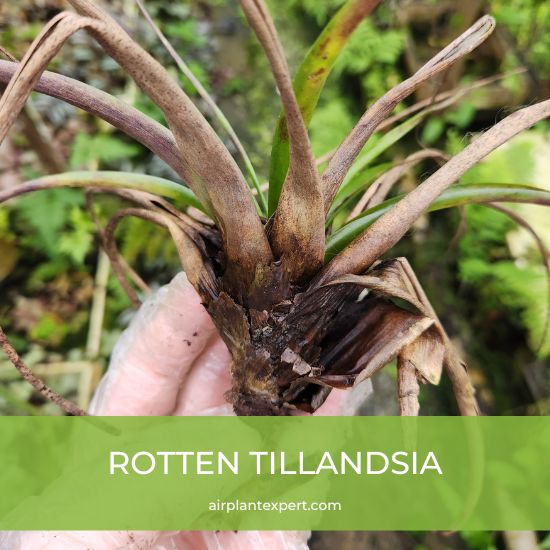
So, what is the best course of action if you think you have overwatered your air plant? Well, we have a detailed article on how to save overwatered air plants if you need further information.
How Do Air Plants Absorb Water?
In a nutshell, air plants absorb water through their leaves. Tillandsia are epiphytes, that have adapted to absorb water and nutrients from the air that surrounds them. They use their leaves to collect water which is then absorbed through microscopic structures called trichomes.
These trichomes (small hair-like structures) are highly effective at capturing moisture from both the daytime and nighttime air as well as from morning dew and mist. This makes Tillandsia incredibly versatile and well-suited to many environments.
In addition to collecting water, trichomes also play a vital role in capturing carbon dioxide (CO2) from the air. This allows air plants to process the gas into oxygen and use it to grow and develop. The amount of CO2 absorption varies based on the species of air plant, with xeric varieties requiring less CO2 than mesic varieties.
Tillandsia are native to a wide range of environments from cloud forests to arid deserts. However, they all require humidity to survive. Because air plants absorb water from the air they need a relatively humid environment to keep their trichomes moist and functioning correctly.
Tillandsia can uptake moisture whenever it is available, day and night, however, it is best to water your plants in the morning. This allows the plants to dry during the day and absorb CO2 at night.
Humidity and Air Plants
Humidity plays a crucial role in the care of air plants. By maintaining an optimal humidity level you will be creating a more natural environment for your Tillandsia to grow and thrive.
The ideal humidity level for most species of air plants is between 50-70%.
Indoor environments often have low humidity levels of around 30-50% which may not be high enough for your Tillandsia to flourish and thrive. So how do we overcome this issue? Well, there are several ways you can increase the humidity in an indoor environment:
- Purchase a humidifier – this is an excellent way of increasing the humidity in an entire room or conservatory. It’s not the cheapest method but it is reliable and maintenance-free, well almost.
- Use gravel and a tray of water – this method is ideal if your air plants are mounted on rocks or wooden objects. Add the gravel to the tray, add some water, and place your mount/display on top. You could also place plants directly on the gravel but make sure they don’t touch the water.
- Add a bowl of water – this is the least expensive option and works surprisingly well. You can use any object such as a bowl, tray, saucer, or dish filled with water. You can also use multiple items to increase the humidity if need be.
- Keep your Tillandisa near soil-based plants – when you water house plants some of the water in the soil will evaporate creating a micro-climate. If you group your house plants you could also keep your Tillandsia nearby so they benefit from the additional humidity.
- Choose a suitable location – some areas of your home provide a better environment than others. For example, kitchens and bathrooms generally have higher humidity levels and are therefore better locations to grow air plants.
All of the above will help to create a micro-climate that mimics the air plant’s natural habitat.
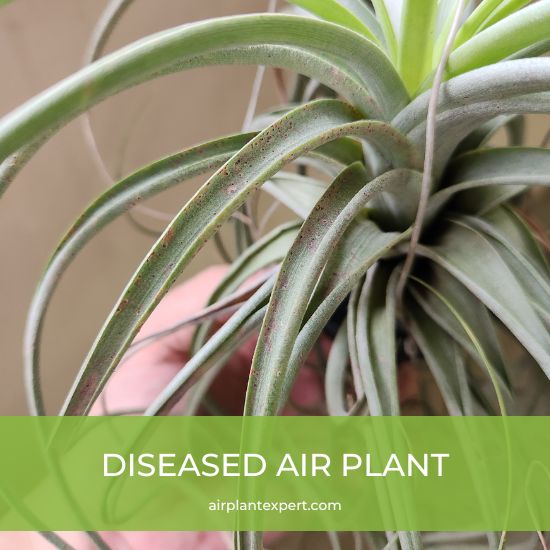
The level of humidity surrounding your Tillandsia will ultimately dictate how often you need to water your plants. Remember, too little humidity may stunt your plant’s growth, and too much can lead to rotting, mold, and diseases.
7 Expert Tips for Watering Tillandsia
Tillandsia requires a unique approach to watering to ensure they get all the hydration they need. While the watering needs vary depending on the type of Tillandsia and its surrounding environment, here are seven expert tips for watering your air plants:
1. Water Quality Matters
The source of your water matters when it comes to watering your Tillandsia. It’s best to use rainwater as it is usually free from harmful chemicals. If the only option is tap water, you will want to prepare the water first by leaving it at room temperature for at least 24 hours to allow the chlorine in the water to evaporate before using it on your plants.
2. Frequency of Watering
Most Tillandsia requires soaking once a week, while some xeric varieties can go longer, around 10 days. Some xeric species only require misting but these are far and few between. It is important to not overwater as it can lead to rotting and other issues. Supplemental misting of all species 2-3 times a week is beneficial.
3. Optimal Time of Day
It is best to water your Tillandsia early in the morning giving your plants plenty of time to dry before nightfall. Also, air plants mainly absorb nutrients and water during the day, and absorb CO2 at night.
4. Soaking or Misting?
The optimal way to water Tillandsia kept in an indoor environment is by soaking them in water for about 20-30 minutes once a week. Having said that, some xeric species may prefer a thorough misting 2-3 times a week instead, so get to know your plants.
5. Monitor Your Plants
Every species of Tillandsia will have different watering needs so it’s important to monitor the appearance of your plants. Look out for clues such as drooping leaves, dry brown leaf tips, and weak-looking foliage, and adjust your watering schedule accordingly.
6. The Importance of Humidity
Tillandsia thrives in a humid environment, so consistent moisture levels are essential for the good health and longevity of your plants. You can increase the humidity around your air plants by misting regularly or by implementing the tips I mentioned in the section above.
7. Nutrients in the Water
It’s important to note that Tillandsia kept in indoor environments cannot rely solely on tap water for their nutrients. Yes, air plants absorb nutrients from the surrounding air, however, indoor locations seriously lack adequate nutrients. A pre-mixed air plant fertilizer is necessary to keep your plants in tip-top condition. For specific information on nutrients and fertilizer, we have an awesome article on how to fertilize air plants.
The information provided in this article is very comprehensive and will no doubt give you a greater understanding of how best to water your air plants – giving you happy and healthy Tillandsia for years to come.